
Edge Delivery Services
How does "document based editing" work?
Edge Delivery Services
The time has finally come - the concept and planning of the urgent advertising campaign is complete.
The drafts, which were created in Microsoft Word and Excel, have been approved internally. The web campaign is now to be rolled out at lightning speed.
The documents are handed over to AEM content authors, diagrams are exported from Excel and then imported into the DAM by AEM asset authors, template authors are needed, the workflow is started... and after several work steps, the campaign is published on the web.
Sometimes a document-based creation of websites would be desirable in order to be able to publish content quickly.
Adobe has also recognized this and launched Edge Delivery Services (EDS) in the AEM as a Cloud Service infrastructure. Edge Delivery Service (EDS), also known as AEM Franklin or Project Helix, is a new model for quickly creating fully comprehensive websites using Google Docs or Microsoft Docs (Word and Excel).
As an integrated part of Adobe Experience Managers, EDS and AEM sites can coexist in the same domain. EDS can also be used with Adobe Target, Analytics and Launch. Figure 1 shows the difference between the traditional infrastructure, consisting of AEM Author and Publisher, and Edge Delivery Service.
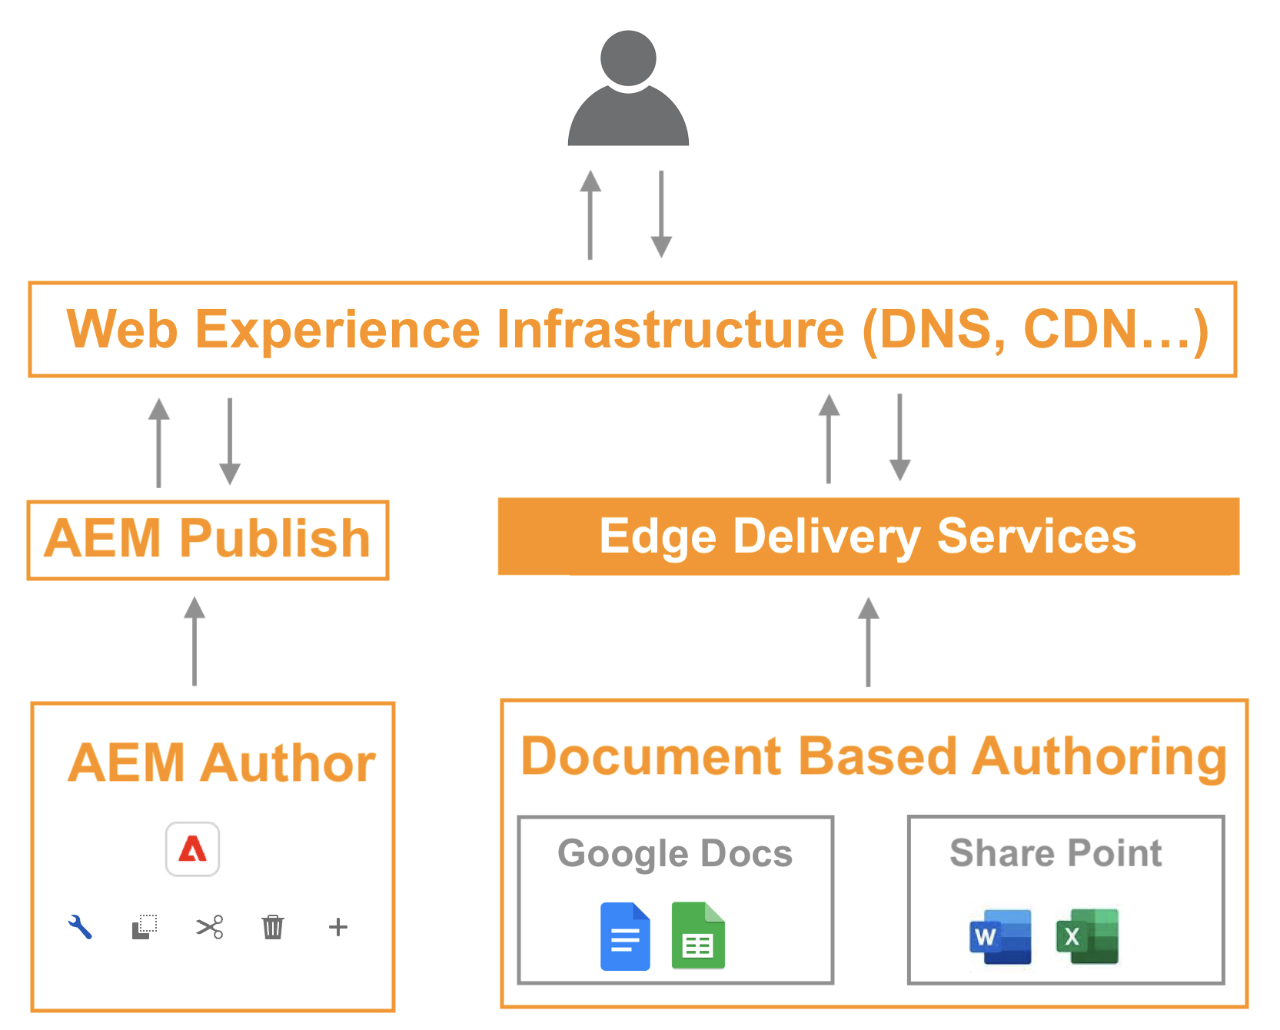
Figure 1: Comparison of the AEM sites & EDS infrastructure
This means that authors can create websites from their usual word processing program. The document simply has to conform to a certain structure, which is described below.
Document Based Authoring
Any document (Microsoft Word/Excel or Google Drive Doc) can be converted into an HTML page with the help of Edge Delivery Services and integrated into the website.
In order to create a clear webpage, the document is grouped and structured into equal subject areas (so-called sections).
A document can have any number of sections. These can be easily subdivided in the document with three dots (...) or a horizontal line.
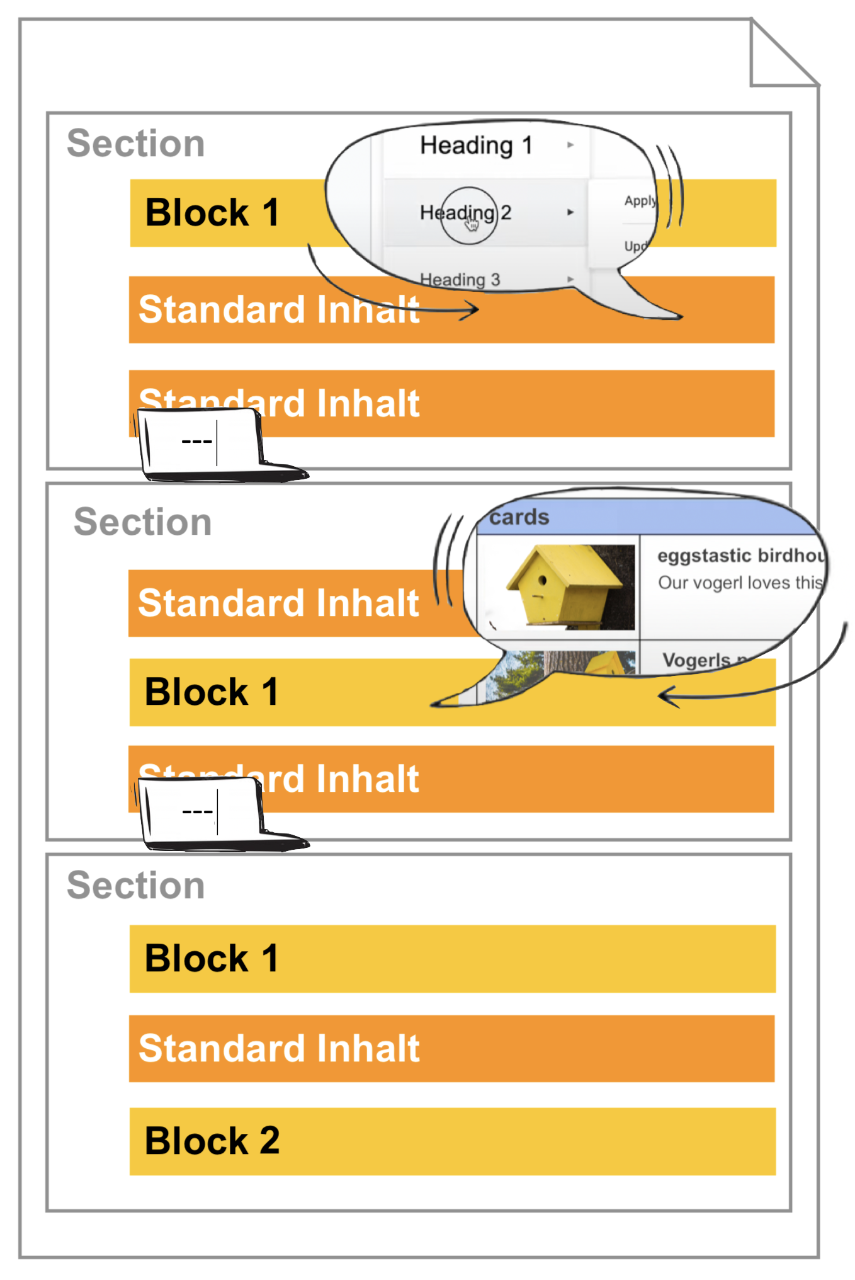
Figure 2: Structure of a document for playout to Edge Delivery Services
Figure 2 shows that sections can contain two different types of content: Standard content and blocks.
- Standard content: This represents conventional HTML elements such as headings (h1-h6), paragraphs (p), lists (ol, ul), images (picture) and so on. For example, if authors insert a heading-2 heading in the document, this is automatically converted into an h2 headline in the HTML for the website.
- Block: Block content is somewhat more complex and is comparable to AEM components, such as a carousel: It is therefore content with functionality or a specific appearance.
Blocks are created using a conventional table, which can have different numbers of columns and rows.
Figure 3 illustrates the simplicity of using the blocks by highlighting the direct relationship between the table name and the type of block to be generated.
For example, if the table name is "cards" (available out of the box in the standard project), clear web cards are created for the website.
The blocks, their names and their functions are stored in the project and authors can use them as they wish.
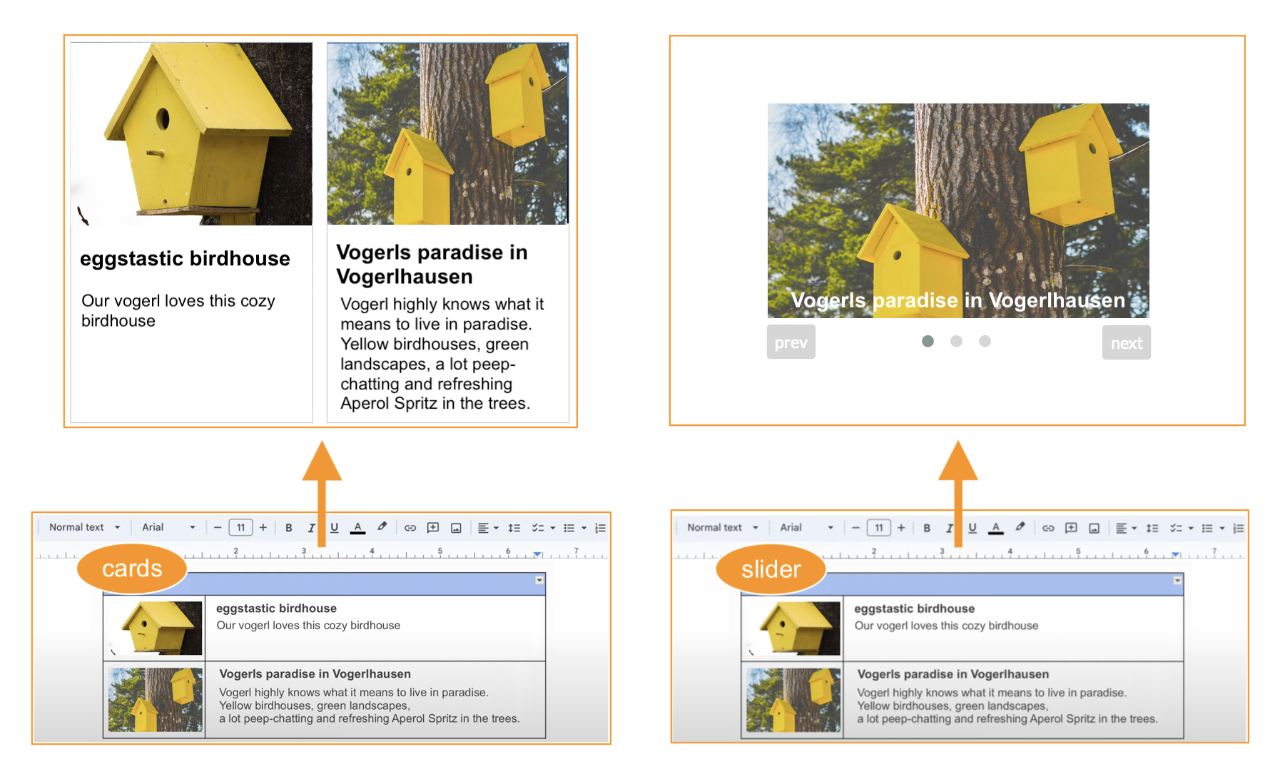
Figure 3: Blocks are created with conventional tables in the document
In summary, it may seem incredible, but it's true:
Content authors only need to know how to divide the website into sections (--- using horizontal lines) or how to create blocks (using a table and its table name that determines the block). Apart from this, website creation for authors is the usual process of document creation.
A header and a footer are automatically added to each document during website generation, which can be edited in a corresponding document.
Documents can also be included in documents, linked, stored with SEO data and much more.
The name of the document is reflected in the URL, with "index" being the start page of the parent folder.
Previewing and publishing pages
To generate a web page from the text document and make it available for EDS, the pages must first be published, analogous to the publishing process already known from AEM Sites.
The option of previewing and publishing offers the advantage of checking changes in advance. This makes it possible to ensure that the website displays the desired content correctly before it is made publicly accessible. This allows for careful control and a smooth presentation of content to users.
With the help of the Chrome extension "Sidekick" (this extension also works with other browsers) this can be easily realized.

Figure 4: Sidekick web browser extension
Once the extension has been installed in the web browser (Fig. 4), it is available for the browser. The following functions are available for EDS:
- Preview & bulk preview of the website
- Publish & Mass Publish (3)
- Edit document (opens the document) (1)
- Reload to see changes (2)
- Copy URLs
- Unpublish (unpublish)
- Delete the preview
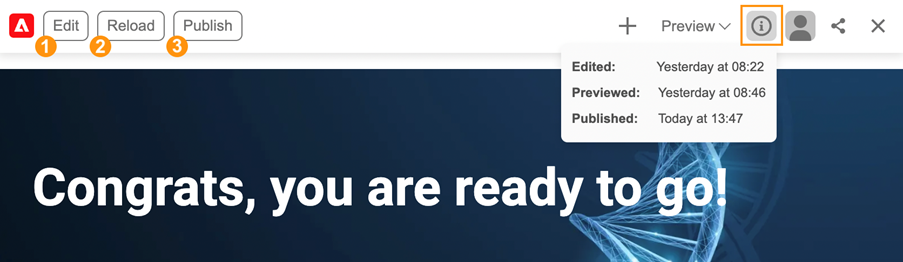
Figure 5: Preview of a website with Adobe Sitekick activated
The Sidekick browser extension offers many more functions.
Fast technical setup
Setting up the EDS infrastructure is extremely straightforward and can be set up quickly.
The following is required:
- GitHub account
- Google account
- Google Drive / Sharepoint
- If necessary, node / npm for a local server and a local development environment
First, a new repository is created.
Adobe offers a fully functional repository (aem-boilerplate) [https://github.com/adobe/aem-boilerplate] that can be used as a template.
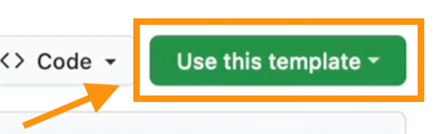
Figure 6: Use template for own repository
The name of the repository reflects the name of the website.
Caution: The combination of branch, repository name and Git user name must not have more than 60 characters.
A program must also be installed in order to synchronize the code from the repository to EDS. The repository can be linked using the aem-code-sync [https://github.com/apps/aem-code-sync] function.
The website is now already accessible and is made up of the branch name, the repository name and the Git user name.
{branchname (1) }-{Git repository name(2) }-{Git username (3)}.hlx.page
In the example in Figure 7:
- https://main--eggsEDS-eggspert.hlx.page für die Vorschau
- https://main--eggsEDS-eggspert.hlx.live für die veröffentlichte Seite
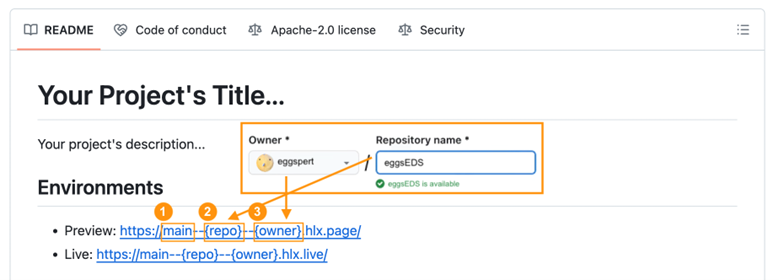
Figure 7: Composition of the URL using an example
A default content is played from the standard, which can be found in Adobe's Google Drive [https://drive.google.com/drive/folders/1MGzOt7ubUh3gu7zhZIPb7R7dyRzG371j].
The existing content (footer, index and nav for the header) can be copied and pasted into a separate folder in Google Drive or Sharepoint.
This folder must now be shared with helix.com in order to be able to display the documents, see Figure 8.
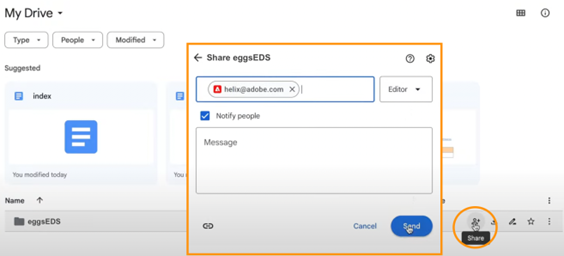
Figure 8: Sharing the Sharepoint folder at helix@adobe.com
Finally, a configuration must be edited in the Git repository:
On the first level is the file fstab.yaml, here the mountpoint of the Google Drive folder just created must be specified.
Example
mountpoints:
/: https://drive.google.com/drive/u/0/folders/folderUID
The change must be pushed into the repository and the user's own Google Drive documents are now displayed as content for the website.
In just a few minutes, document-based authoring is set up and the content in Google Drive represents the authoring layer.
Development & development environment
All the information required for the website (fonts, icons, styles, etc.) can be found in the Git repository and can be changed and expanded as required.
The "blocks" folder can also be found in the root folder. The blocks with their functionalities and styles are listed here.
If a new block is required (e.g. a carousel), this can be created with the corresponding CSS & JS files. To be able to use the carousel for authoring, only the name of the folder in the blocks must correspond to the name of the table in the document.
Global stylings can be found under styles/styles.css and global scripts under scripts/scripts.js.
To avoid having to push changes directly to the repository during development, a local development environment can be used. This is easy to set up with an aem-cli command line interface.
The following node command must be executed:
npm install -g @adobe/aem-cli
As soon as the CLI is installed, a node server can be set up with just one command:
aem up
The website can now be accessed on a node server under localhost:3000 with an integrated watcher.
Conclusion
This new way of creating content requires unlearning certain behaviors and adopting new ones.
With the general availability of Edge services, AEM now offers great added value, as any Office user could act as an author and create content in seconds without any training.
And it's promising:
The website created with EDS have a Lighthouse rating (score) of close to or exactly 100, which illustrates the excellent power, performance and quality of the web pages.
Do you have any further questions? Or are you interested in a training course?
Do not hesitate to contact us!
Author

Contact us
Contact

Martin Brösamle
Head of Sales and Marketing
Balanstr. 73, House 19 81541 Munich
Email: info@eggs.de Headquarter: +49 (89) 743456-0